No-Bake Witch Hat Cookies – Cute & Simple Halloween Dessert Idea
No-Bake Witch Hat Cookies are the kind of Halloween treat that makes people go, “Wait… you didn’t bake those?!” and you just smile because—nope, you didn’t run the oven for even a second. These little bites of chocolatey magic come together in minutes and are so darn cute they look like something straight off a Pinterest board (minus the stress).
If you’re like me, every October you swear you’ll bake something spooky and festive, but between work, school runs, and finding your kid’s missing cape five minutes before trick-or-treating… who has the time? That’s exactly why I adore these no-bake witch hat cookies—they’re super easy, freaky fun, and taste like Halloween joy wrapped in chocolate.
They’re the perfect edible craft to make with friends, kids, or anyone who loves Halloween snacks that look as good as they taste. Let’s talk about how to make them (spoiler alert: it’s ridiculously simple).
Why You’ll Love This Recipe
- No oven required. Perfect for busy nights or last-minute party prep.
- Five ingredients. That’s it. Really.
- Kid-friendly craft meets dessert. Your little ghouls can help decorate.
- Adorably festive. These look way more impressive than they are.
Recipe Card
Prep Time: 15 minutes
Cook Time: 0 minutes
Total Time: 15 minutes
Servings: 4 (makes about 12 cookies total—3 per person)
Ingredients (for 4 servings)
- 12 fudge-covered cookies (Oreos, Fudge Stripes, or Fudge-Covered Peanut Butter Cookies all work)
- ¼ cup white frosting (store-bought or homemade buttercream)
- A few drops of orange food coloring (or purple, green—Halloween colors!)
- 12 Hershey’s Kisses, unwrapped
- 12 mini yellow M&Ms (for the “hat buckle”)
Step-by-Step Instructions
1. Get your spooky setup ready
Lay out your cookies on a baking sheet or plate, flat side up. Have your kisses and M&Ms unwrapped and ready. You’ll want to move fast once you start frosting—consider this your little witch’s assembly line.
2. Color your frosting
In a small bowl, add a few drops of food coloring to your white frosting. Go slow—a little goes a long way! Mix it until you hit your ideal Halloween hue. (Personally, I’m team bright orange.)
Pro tip: Gel food coloring gives you those bold, bakery-level colors without thinning your frosting.
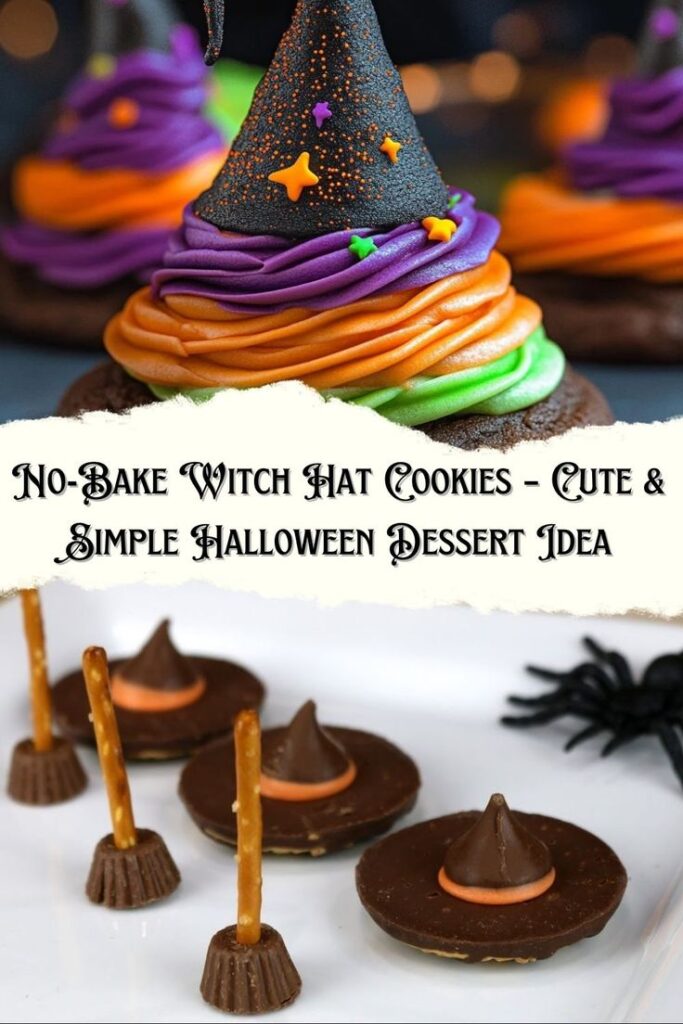
3. Add the “brim” of the hat
Spoon your frosting into a small plastic sandwich bag and snip a tiny corner off the end. Pipe a circular dollop in the center of each cookie. (It should be about the size of the base of a Hershey’s Kiss.)
4. Top with your “hat”
Press a Hershey’s Kiss directly into the center of the frosting. As you press, the frosting will gently squish out to make a neat, colorful ring. That’s the hat band—adorable, right?
5. Add the buckle shine
Stick one mini yellow M&M onto the frosting ring for that witchy buckle detail. If you’re feeling extra, add edible glitter or Halloween sprinkles too.
6. Set and snack
Let the frosting “set” for about 15–20 minutes at room temp. Then grab one, pop it in your mouth, and tell me that isn’t the cutest thing you’ve ever eaten.
Tips, Tricks & Variations
These cookies are truly foolproof, but here are a few insider tricks to make them look bakery-perfect:
- Use a piping bag (or plastic baggie!) for clean edges—it keeps your hats looking polished.
- Work in small batches. If you’re assembling with the kids, do 4–5 at a time so the frosting doesn’t harden too fast.
- Switch up the chocolate. Dark chocolate Hershey’s Kisses? Caramel-filled ones? Go wild!
- Add a pop of magic. Swap the frosting color for green, purple, or even black. (TBH, the mix of colors looks amazing on a platter.)
- Mix in candy melts. Melt orange or green candy melts in the microwave and use those instead of frosting. It’ll harden quicker and look glossy.
Make-Ahead & Storage Tips
You can totally make these a day or two before your Halloween bash. Just follow these pointers:
- Storage: Keep them in an airtight container at room temperature for up to 1 week.
- Layering tip: If you’re stacking them, place parchment paper between layers to keep the frosting pretty.
- Avoid heat! Keep them in a cool, dark spot (no sun or near-the-stove zones). They’re witches, not s’mores. 😉
Serving Suggestions
Alright, here’s where we get festive. These cookies are bite-sized joy bombs and go perfectly with:
- Hot apple cider (because obviously).
- A Halloween snack board with popcorn, gummy worms, and pretzel rods.
- Pumpkin spice lattes for weekend fall vibes.
- A kids’ Halloween party table—pair them with orange punch and candy corn.
Want to really impress people? Scatter a few candy eyeballs around the plate for that witchy “potion in progress” vibe.
Fun Variations for Every Mood
- Peanut butter lovers: Use fudge-covered Nutter Butters as your cookie base.
- DIY hat shop: Mix and match frosting colors—orange, green, and purple—for a sprinkle of chaos magic.
- Gluten-free version: Grab gluten-free chocolate wafers or gluten-free Oreos and use allergy-friendly chocolate kisses.
- Mini witch hats: Try using mini cookies and mini Hershey’s Kisses for bite-sized versions (adorable on cupcakes!).
Why They Always Steal the Show
You know those desserts that look like you tried hard but actually took 15 minutes between folding laundry and finding the cat under the pumpkin decor? That’s this recipe.
Every time I make these for a Halloween get-together, people think they’re bakery-bought. My favorite part? Watching everyone’s face when they realize they’re just cookies, frosting, and Kisses. 😉
And let’s be honest—Halloween baking can be messy and time-consuming. But these no-bake witch hats? They’re the costume-party equivalent of yoga pants: comfortable, effortless, and everyone loves them.
Pro Tips from My Kitchen
- Keep frosting at room temp. Too cold, and it’s stiff and cranky. Too warm, and it slides like lava.
- Let kids pick their own colors. It keeps them engaged (and makes for adorable results).
- Store leftovers responsibly. They’ll vanish faster than you think once people spot them on the counter.
Personal Note
Last Halloween, I made two dozen of these for my neighbor’s pumpkin carving party. I swear, they disappeared faster than the cider did. My friend Jill asked which bakery I bought them from—best compliment ever. They’ve become a tradition around here now, one of those “making memories” kind of recipes that’s just as much fun to create as to eat.
Because at the end of the day, Halloween isn’t about perfect desserts—it’s about sticky fingers, giggles, and a table full of sweet chaos. And these cookies? They deliver.
Conclusion
So there you have it—No-Bake Witch Hat Cookies, the easiest way to make Halloween look like you planned it for weeks (even if you threw it together during commercials). They’re cute, quick, and totally irresistible.
Make them for your next party, throw them on a spooky platter, and watch your guests’ eyes light up.
So go ahead—grab those Hershey’s Kisses, smear some frosting, and let the magic happen. If you end up trying them, tag me on social—I’d love to see your witch hat creations! 🙂