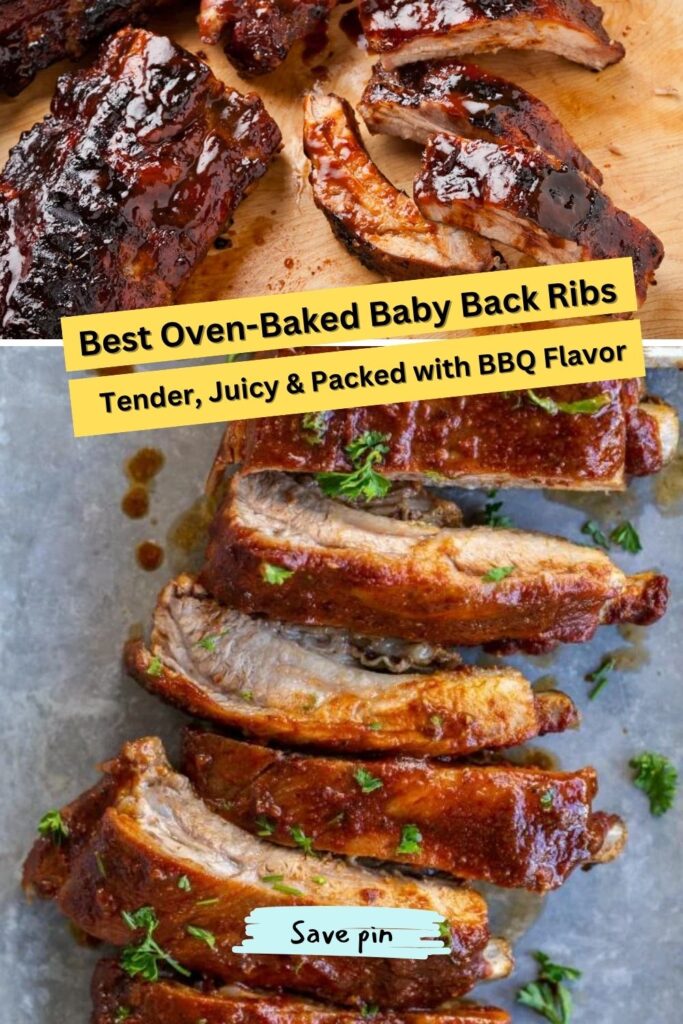
Best Oven-Baked Baby Back Ribs | Tender, Juicy & Packed with BBQ Flavor
Baby back ribs — just saying it out loud makes you hungry, doesn’t it? Whether you’re firing up the grill for a summer cookout or slow-roasting on a lazy Sunday, these ribs are what comfort food dreams are made of. They’re tender, juicy, smoky, and sticky in all the right ways. And if you’ve ever wondered how restaurants get them that good — here’s the secret: a little patience, a killer dry rub, and just the right amount of sauce.
Today, we’re talking all about baby back ribs — how to cook them, what makes them different, and how to make your own plate of finger-lickin’ perfection right at home. Grab a napkin (or three), because things are about to get saucy.
What Are Baby Back Ribs, Anyway?
Let’s clear this up first because not all ribs are created equal.
Baby back ribs come from the top of the rib cage, right where the ribs meet the spine — closer to the loin. That’s why they’re called “baby” — not because they come from little pigs, but because they’re shorter and more tender than spare ribs.
Here’s the quick rib breakdown:
- Baby back ribs: Tender, leaner, and cook faster.
- Spare ribs: Bigger, meatier, and have more fat (aka, more flavor if you’re into that).
- St. Louis-style ribs: Trimmed spare ribs that look cleaner and more uniform.
If you’re after that perfect fall-off-the-bone bite, baby backs are your best friend.
Ingredients for the Best Baby Back Ribs (Serves 4)
Here’s what you’ll need for ribs that taste like a backyard BBQ party in your mouth:
For the Ribs:
- 2 racks baby back pork ribs (about 4 lbs total)
- 1 tablespoon olive oil
- 1 cup barbecue sauce (store-bought or homemade — your call!)
For the Dry Rub:
- 3 tablespoons brown sugar
- 1 tablespoon paprika
- 1 tablespoon garlic powder
- 1 tablespoon onion powder
- 2 teaspoons salt
- 1 teaspoon black pepper
- 1 teaspoon smoked paprika (for that deep BBQ vibe)
- ½ teaspoon cayenne pepper (optional, if you like a kick)
Cooking Time of Baby Back Ribs:
- Prep time: 20 minutes
- Cook time: 2 hours 30 minutes
- Total time: 2 hours 50 minutes
Step-by-Step Instructions: How to Cook Baby Back Ribs
Alright, let’s get to the fun part. Making restaurant-quality ribs at home isn’t rocket science — it’s more like low and slow BBQ magic.
Step 1: Prep the Ribs
Start by removing the silver skin — that thin, shiny membrane on the bone side. It’s tough and chewy, and nobody wants that. Slip a knife under it, grab it with a paper towel, and pull it right off. Easy!
Brush the ribs with a thin layer of olive oil. This helps the rub stick and lock in moisture.
Step 2: Apply the Dry Rub
In a small bowl, mix your dry rub ingredients. Sprinkle generously on both sides of the ribs, massaging it in like a spa treatment. (Your ribs deserve some love.)
Step 3: Wrap and Chill
Wrap the ribs tightly in foil and refrigerate for at least 1 hour, or up to overnight. This helps the flavors sink deep into the meat.
Step 4: Bake Low and Slow
Preheat your oven to 275°F (135°C). Place the wrapped ribs on a baking sheet and bake for 2.5 hours.
The slow bake melts the fat and tenderizes the meat. When you open the foil later, it should smell like heaven itself.
Step 5: Sauce and Sear
When the ribs are done baking, carefully remove them from the foil. Brush them with barbecue sauce — be generous.
Now, you’ve got two options:
- Grill: Place them on a medium-hot grill for 5–7 minutes per side, just to caramelize that sauce.
- Oven: Pop them under the broiler for 5 minutes, keeping an eye out so they don’t burn.
The result? Sticky, glossy ribs that practically slide off the bone.
The Secret to Perfect Ribs Every Time
Ever wonder why some ribs turn out tough while others melt in your mouth? It’s all about time and temperature.
Here’s the golden rule:
Low heat + long cook = tender ribs
If you rush it, the collagen in the meat won’t have time to break down. Take your time, and you’ll be rewarded with that signature “pull-apart” texture.
And don’t go drowning them in sauce before cooking — you’ll just burn the sugar. Always sauce after they’re cooked through. Trust me, I learned that the messy way once. 🙂
Homemade BBQ Sauce (Optional but Totally Worth It)
Sure, bottled BBQ sauce is fine, but if you’ve got 10 extra minutes, this one’s a game-changer.
Quick Homemade Sauce:
- 1 cup ketchup
- ¼ cup apple cider vinegar
- ¼ cup brown sugar
- 1 tablespoon Worcestershire sauce
- 1 teaspoon smoked paprika
- ½ teaspoon garlic powder
- Dash of hot sauce (optional but recommended)
Simmer everything in a saucepan for 10 minutes until thickened. Boom — homemade BBQ sauce that tastes ten times better than store-bought.
Serving Suggestions (Because Ribs Deserve Company)
Ribs are awesome on their own, but IMO, the sides make the meal. Here are some perfect pairings:
- Creamy coleslaw – crisp and cool against the smoky ribs.
- Baked mac & cheese – the gooey partner every rib deserves.
- Cornbread – sweet, buttery, and ridiculously good at soaking up sauce.
- Grilled corn on the cob – because why stop at one smoky thing?
Want to go all out? Add iced tea or cold beer and some backyard music, and you’ve got yourself a scene straight out of a summer cookout commercial.
Common Mistakes to Avoid
You know what’s worse than overcooked ribs? Dry ones. Avoid these rookie mistakes:
- Skipping the foil: You’ll lose all that precious moisture.
- Cranking the heat too high: Slow and steady wins this race.
- Not letting them rest: Give ribs 10 minutes after cooking. The juices redistribute, and the flavor deepens.
Seriously, patience pays off here — like waiting for the perfect song to drop.
Grill vs. Oven: Which Wins?
Okay, real talk. Both methods can produce killer ribs — it just depends on your setup.
Grill pros:
- That smoky, charred flavor you can’t fake.
- Perfect for outdoor cookouts.
Oven pros:
- Foolproof and weather-proof.
- Consistent heat for tender results.
My take? Use the oven to cook them low and slow, then finish on the grill. It’s the best of both worlds.
Storage and Reheating Tips for Baby Back Ribs
Got leftovers? (Lucky you.)
- Fridge: Store in an airtight container for up to 4 days.
- Freezer: Wrap tightly and freeze for up to 3 months.
When reheating, wrap in foil and warm in a 300°F oven for 15–20 minutes. Keeps them juicy and flavorful.
And hey, cold ribs the next day? Don’t knock it till you try it. 😉
Baby Back Rib Variations You’ll Love
Want to mix things up? Here are a few flavor twists:
- Sweet & Smoky Maple Ribs: Add maple syrup to your BBQ sauce.
- Asian-Style Ribs: Swap BBQ sauce for hoisin, soy sauce, and ginger.
- Spicy Chipotle Ribs: Add adobo sauce and extra cayenne for a kick.
Each version brings a whole new vibe, and once you master the basics, you can experiment all you want.
Why Homemade Ribs Always Win
Sure, restaurant ribs are convenient, but when you make them yourself, you control everything — the seasoning, the tenderness, the sauce. And IMO, nothing beats that moment when your kitchen smells like a BBQ joint and your friends start hovering around the oven asking, “Are they ready yet?”
Cooking ribs at home is part science, part patience, and all heart. Baby Back Ribs.
Final Thoughts
If you’ve read this far, congrats — you’re officially in the ribs appreciation club. Making baby back ribs at home might sound intimidating, but it’s actually super doable. The secret is simple: take your time, trust the process, and don’t be afraid to get a little messy.
So next time you’re craving something smoky, sticky, and full of flavor, skip the takeout — make these ribs yourself. I promise, you’ll impress anyone lucky enough to grab a plate. Baby Back Ribs.
Now grab some napkins, cue your favorite playlist, and dig in. Because let’s be real — when it comes to ribs, manners are optional. 😎