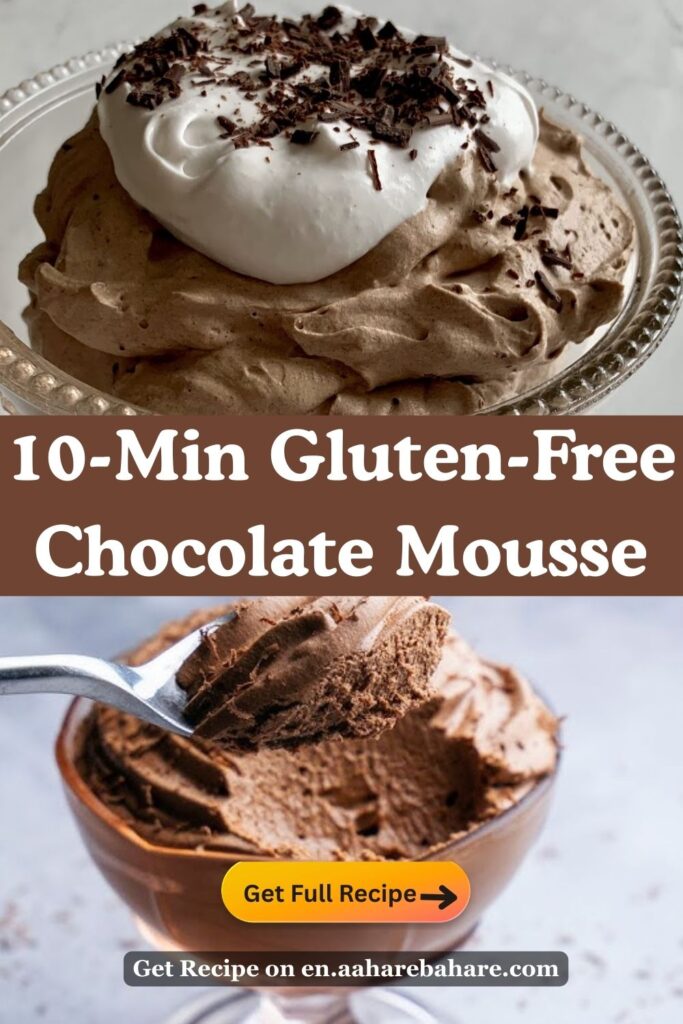
10-Min Gluten-Free Chocolate Mousse Recipe | Rich, Creamy, No-Bake Dessert
Gluten-Free Chocolate Mousse fans, you picked a good day to read about dessert.
Why Gluten-Free Chocolate Mousse Wins
Gluten-Free Chocolate Mousse gives you that rich, silky chocolate hit without the gluten drama. Ever crave something decadent but still want your stomach to stay on speaking terms with you? This dessert does exactly that.
I love this recipe because it feels fancy, but you can whip it up with simple ingredients and zero pastry-chef skills. You serve it in little glasses, everyone thinks you worked all day, and you just smile and take the compliment.
Ingredients For 4 People On Chocolate Mousse
Here’s what you need for about 4 generous servings:
- 200 g dark or semi-sweet chocolate (make sure it’s clearly gluten-free)
- 2 cups (480 ml) cold heavy whipping cream
- 3 tablespoons powdered sugar
- 1 teaspoon pure vanilla extract
- A tiny pinch of salt
- Optional toppings:
- Fresh berries
- Shaved chocolate
- Whipped cream
- Crushed gluten-free cookies or nuts
You check every label, right? Gluten sneaks into flavorings, so always pick chocolate and add-ons that say gluten-free or come from brands you trust.
Prep And Cooking Time On Chocolate Mousse
You don’t need all day for this, promise.
- Prep time: about 20 minutes
- Chill time: at least 2–3 hours (longer = better texture)
- Total time: about 2.5–3.5 hours
So yeah, you start this earlier in the day if you want mousse that stands tall and proud at dessert time.
Step-by-Step Instructions
Step 1: Melt The Chocolate
Break the chocolate into small pieces and place it in a heatproof bowl.
Set the bowl over a small pot of gently simmering water (don’t let the bowl touch the water) and stir until everything melts and turns smooth.
Take the bowl off the heat and let the chocolate cool to just warm or room temperature. You want smooth chocolate, not hot chocolate soup that wrecks your cream.
Step 2: Whip The Cream
Pour the cold heavy cream into a large mixing bowl.
Add the powdered sugar, vanilla extract, and a small pinch of salt.
Whip with a hand mixer or stand mixer until you get medium peaks:
- The cream stands up but still looks soft and smooth.
- If it looks grainy or super stiff, you went too far and the cream feels sad.
Step 3: Make The Chocolate Base
Take about one third of the whipped cream and stir it into the melted, cooled chocolate.
You mix this part more firmly because you just want to loosen the chocolate and make it lighter.
Once it looks smooth and lighter in color, you feel ready for the next step.
Step 4: Fold For That Airy Texture
Now gently fold in the remaining whipped cream with a spatula.
You move the spatula around the bowl in big, slow motions, turning the bowl as you go.
- You keep folding until no white streaks remain.
- You stop before you beat out all the air.
Think “fluffy cloud vibes,” not “cement mixer.”
Step 5: Portion And Chill
Spoon or pipe the mousse into 4 small glasses, ramekins, or bowls.
Smooth the tops a little, but don’t stress too much; rustic looks cute.
Cover and chill for at least 2–3 hours.
If you leave it overnight, the texture sets even more and the flavor deepens, which works great for make-ahead dinners.
Step 6: Chocolate Mousse Garnish And Serve
Right before serving, you can:
- Add a spoonful of whipped cream
- Sprinkle shaved chocolate or cocoa powder
- Add fresh berries
- Throw on crushed gluten-free cookies or toasted nuts for crunch
You build your own dessert “personality” here, so have fun with it.
How To Keep It Truly Gluten-Free Chocolate Mousse Cake
You want mousse, not mystery stomach issues, right?
Keep these things in mind:
- Always choose chocolate labeled gluten-free or from a brand you trust.
- Check powdered sugar and vanilla for hidden gluten in additives or processing.
- If you add cookies or toppings, make sure they’re clearly gluten-free.
Gluten usually sneaks in through flavorings, cookie crumbs, or cross-contamination, not the mousse basics themselves. So you stay picky; your body thanks you later.
Texture, Flavor, And Sweetness Tweaks
Everyone likes their mousse a bit differently, so tweak things your way.
- Want it richer?
- Use darker chocolate (like 70%) for a more intense, less sweet mousse.
- Want it lighter and sweeter?
- Use semi-sweet or mix milk and dark chocolate.
- Want it fluffier?
- Whip the cream just slightly softer and fold very gently for extra air.
- Want it firmer?
- Chill overnight and use darker chocolate, which sets more firmly.
Ever notice how chilled mousse tastes less sweet? If you like it quite sweet, taste the chocolate base before you finish folding and add an extra spoon of powdered sugar if needed.
Common Mistakes (And How To Dodge Them)
You avoid a mousse meltdown (literally) when you watch out for these classic slip-ups.
- Chocolate too hot
- You pour steaming chocolate into cold cream, and boom, you lose the airy texture.
- Let the chocolate cool to just warm before mixing.
- Overwhipped cream
- You whip past medium peaks, and the cream turns firm and grainy.
- If that happens, you add a splash of cold cream and fold gently to soften it.
- Rough folding
- You stir like you’re making bread dough and knock out all the air.
- You fold with calm, slow motions and stop when it looks smooth.
You don’t need perfection; you just need “good enough to eat with a spoon and grin.”
Variations You’ll Want To Try
Because once you master the base, you start to play, right?
- Mocha mousse
- Add 1–2 teaspoons instant coffee or espresso powder to the melted chocolate.
- Orange chocolate mousse
- Add 1 teaspoon orange zest and a splash of orange extract.
- Nutty mousse
- Swirl in a couple of spoons of smooth peanut butter, almond butter, or hazelnut spread.
- Vegan-ish twist
- Swap heavy cream for coconut cream (from chilled full-fat coconut milk) and use dairy-free gluten-free chocolate.
FYI, coconut versions taste amazing and feel a bit lighter, even if your brain still knows you’re eating dessert. 🙂
Serving Ideas For Different Occasions
You can dress Gluten-Free Chocolate Mousse up or keep it casual.
- For date night
- Serve in stemmed glasses with shaved chocolate and berries.
- For family dinner
- Use small glass jars or ramekins so everyone grabs their own.
- For a party
- Make mini portions in shot glasses for a dessert bar.
You can also pair it with:
- Fresh fruit platters
- A small gluten-free cookie on the side
- A drizzle of salted caramel or berry coulis if you want to show off
Ever notice how anything looks fancier when you put it in a tiny glass and add one berry on top? Same here.
Gluten-Free Chocolate Mousse FAQs
1. Can I make this mousse ahead of time?
Yes, you can make it a day in advance and chill it until serving time.
The texture actually improves when it sits for several hours, so “lazy planner” you wins here.
2. Does chocolate mousse normally contain gluten?
Classic chocolate mousse usually stays gluten-free because it relies on chocolate, cream, sugar, and sometimes eggs.
Gluten usually appears in add-ins like cookies, flavorings, or cross-contamination, so you still check labels and stay careful.
3. Can I skip the sugar?
You can reduce the sugar if you use sweeter chocolate, but sugar helps balance bitterness and improves texture.
If you cut too much, the mousse can taste a bit flat, IMO.
4. How do I fix mousse that turned grainy?
Grainy mousse usually comes from overheated or seized chocolate or overwhipped cream.
You can gently warm a small portion and whisk it smooth, then fold it back in, but sometimes you just call it “rustic” and eat it anyway. :/
5. Can I freeze gluten-free chocolate mousse?
You can freeze it for a semi-frozen, ice-cream-like dessert, but the texture changes slightly once it thaws.
If you freeze it, serve it partly frozen so it feels intentional and fancy instead of “oops, I forgot it in there.”
You now have a simple, flexible Gluten-Free Chocolate Mousse that you can tweak, dress up, and proudly serve to gluten-free friends without stressing. So, what’s stopping you from grabbing some chocolate and making a batch tonight?